Timelapses and video
Last week we where hiking in the Swedish mountains and as usual I brought the camera and a GorillaPod. Earlier this summer I saw Sean Stiegemeiers amazing timelapse from Iceland and got interested in creating these kinds of videos. One of the evenings we had some really nice clouds coming in over us and passing some peaks closeby. I put up the camera and shot a number of sequences. Found out that I could generate timelapses directly from Lightroom(following Sean McCormack on Twitter) so started experimenting with it. I wanted to merge several of them into one video and the only video editing tool I have is iMovie or Windows Movie Maker. I decided to use iMovie since I have used it mostly lately. Here is the result.
Doing this and converting another video also shot earlier this summer I learned a number of things that I wanted to share.
- When making timelapses take many photos!
In a video a second or two is a very short clip and aim for 24 frames per second so if you want a 10 second clip, you have to take 240 photos! - Black first frame?
The generated videos from Lightroom all have a first black frame. I do not know how to turn that off but neither have I found anyone having this issue. When I imported the videos to iMovie it didnt become a problem but it might be due to the cross fading transitions I use. - Compression settings. What are good values and how do you avoid getting a 500 Mb file?
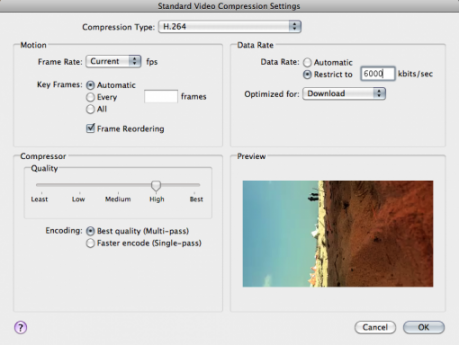
The details is of course very depending on which software you use but in general it should apply to any. In iMovie you have a couple of options. The one that I have noticed influences the file size the most is the maximum bitrate. Of course Quality is a major factor but if you want high quality but not huge size then its the bitrate. After googling a bit I found out that for a 720p movie 6Mbit/s is good. You could go a bit lower but I tired 4.5 Mbit/s and saw some compression artifacts that I didn’t wanted. The rest of the settings I left on default, see image below.
